
So mod_proxy
This module implements a proxy/gateway for Apache. It implements proxying capability for AJP13 (Apache JServe Protocol version 1.3), FTP, CONNECT (for SSL), HTTP/0.9, HTTP/1.0, and HTTP/1.1. The module can be configured to connect to other proxy modules for these and other protocols.
This post also can be named as “How to setup a proxy passer(ProxyPass, ProxyPassReverse) in Apache2” because today we are going to look at is how to setup mod_proxy as a reserve proxy in your linux environment. You might be wondering what’s the difference between a forward proxy server and a reverse proxy server? the answer is here. There could be many situation where you want to set up a reserver proxy, couple of them are mentioned below.
- Front an application server as tomcat or JBoss with Apache
- Application running on a different port other than 80 or 443(we usually only expose 80 or 443 to the public)
- Mask the underlying server/Stop direct access to the underlying server
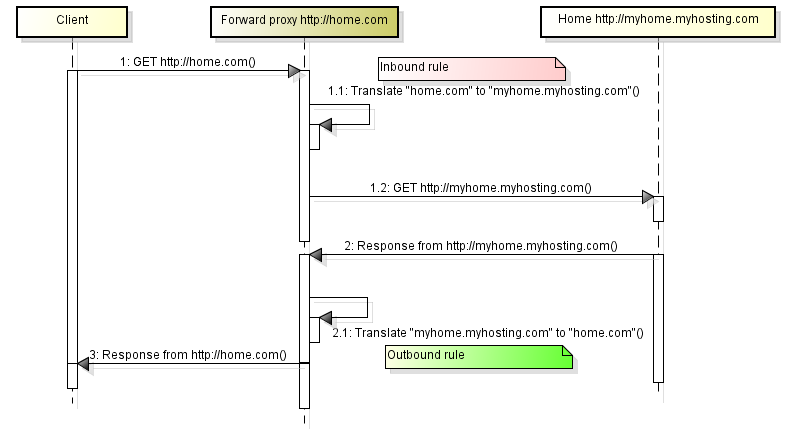
If you are more info on why Apache should be used in front of JBoss/Glassfish/Tomcat? Check this link out. Below image depicts what we are going to do today.
Configuring Apache
1st you have to install Apache on the ubuntu instance using below command.
sudo apt-get update
sudo apt-get install apache2
Now enable the proxy modules which are required,
- proxy – The main proxy module for Apache that manages connections and redirects them.
- proxy_http – This module implements the proxy features for HTTP and HTTPS protocols.
To enable the command would be,
sudo a2enmod proxy proxy_http
Now let’s create a virtual host now. If you don’t know about virtual hosts time to read this post. Moving on let me explain the directives.
- VirtualHost *:80 – Virtual hosts will be listening on the default port 80(could 443 if you are using https)
- ServerName – Server name
- ServerAlias – Alternate names
- ErrorLog – File contains any errors that it encounters in processing requests
- CustomLog – All requests processed by the server. Access log file
- ProxyPreserveHost – will pass the Host: line from the incoming request to the proxied host, instead of the hostname specified in the ProxyPass line.
<VirtualHost *:80>
    ServerName dasunhegoda.com
    ServerAlias www.dasunhegoda.com
    ProxyPreserveHost On

    # ProxyPass / http://[IP Addr.]:[port]/
    # ProxyPassReverse / http://[IP Addr.]:[port]/

    ProxyPass / http://192.168.1.10:8080/
    ProxyPassReverse / http://192.168.1.10:8080/

    ErrorLog "/var/logs/apache2/dasun_error_log"
    CustomLog "/var/logs/apache2/dasun_access_log"

</VirtualHost>
Now enable to the vhost using below command.
sudo a2ensite vhost_name
Now restart the apache web server.
sudo service apache2 restart
Proxing should be working for you now. What above will do is, http://192.168.1.10:8080 application will be exposed via port 80. when you type dasunhegoda.com on the browser it will show the application which is running on http://192.168.1.10:8080. but the browser will never know that it’s the application running on port 8080.
Tips & Tricks
Let’s assume that you are accessing backend server via https if so you have to add SSLProxyEngine on in your virtual host as shown below.
<VirtualHost *:80>
    ServerName dasunhegoda.com
    ServerAlias www.dasunhegoda.com
    ProxyPreserveHost On
    SSLProxyEngine on

    # ProxyPass / https://IP:port/
    # ProxyPassReverse / https://IP:port/

    ProxyPass / https://192.168.1.10:8080/
    ProxyPassReverse / https://192.168.1.10:8080/

    ErrorLog "/var/logs/apache2/dasun_error_log"
    CustomLog "/var/logs/apache2/dasun_access_log"

</VirtualHost>
That’s it. Piece of cake right? Also note that all directives that comes with mod_proxy are explained here. If you have any questions let me know in the comments below. Your feedback is highly appreciated(happy-face).
![]()