
Hadoop is everywhere and gaining attention like crazy. This is not an article which explains what’s it or how it works because there are a lot of good resources for that. So I don’t want to repeat the same stuff but I’m going to help you to go step further and deploy a Hadoop multi node cluster on ubuntu. Pretty interesting right? If you follow the steps given below you can get it done in 15 mins. Let’s start.
Prerequisites
All you need is
- Java 1.7 should be installed.
- 5 Nodes. In my case it’s 192.168.7.87, 192.168.7.88, 192.168.7.89, 192.168.7.90, 192.168.7.91
1. Configure Environment
- Let’s create a dedicated user for hadoop who’s hduser.
useradd -m -d /home/hduser -s /bin/bash
- Configure password-less SSH
1st you will have to decide which node is going to be the master, the secondary master and the slaves. Then make sure that the master node is able to do a password-less ssh to all the slaves and the secondary master. If you don’t know how to setup password-less ssh refer this article. - Edit /etc/hosts and add the below. Also comment out IPV6.
192.168.7.87 master
192.168.7.88 master2
192.168.7.89 slave1
192.168.7.90 slave2
192.168.7.91 slave3
- Edit hostname file
In the master node edit the hostname file as shown below.vim /etc/hostname
just replace the content with master. Now follow the same steps and edit the hostname in other nodes as well. The hostname should be master2, slave1, slave2, slave3 respectively.
2. Download Hadoop
Let’s download hadoop 2.x from here. In here we are going use the version 2.7.1. Extract it to a folder using the below command. I think it would be better to use the hduser’s HOME folder.
tar -zxvf hadoop-2.7.1.tar.gz
3. Configure PATH variables
edit the .bashrc of the hduser using the below command.
vim ~/.bashrc
Add the below content to the end of the file. Please edit the PATH variables if you didn’t use the hduser HOME to extract Hadoop.
#Set JAVA_HOME
export JAVA_HOME=/home/hduser/jdk1.7.0_55
export PATH=$JAVA_HOME/bin:$JAVA_HOME/lib:$PATH;
#Set HADOOP_HOME
export HADOOP_HOME=$HOME/hadoop-2.7.1
export HADOOP_MAPRED_HOME=$HADOOP_HOME
export HADOOP_COMMON_HOME=$HADOOP_HOME
export HADOOP_HDFS_HOME=$HADOOP_HOME
export YARN_HOME=$HADOOP_HOME
export HADOOP_CONF_DIR=$HADOOP_HOME/etc/hadoop
export YARN_CONF_DIR=$HADOOP_HOME/etc/hadoop
export LD_LIBRARY_PATH=$HADOOP_HOME/lib/native
export PATH=$PATH:$HADOOP_COMMON_HOME/bin
export PATH=$PATH:$HADOOP_COMMON_HOME/sbin
Apply them until the next reboot using below command.
source ~/.bashrc
4. Edit hadoop-env.sh
Edit the file etc/hadoop/hadoop-env.sh in Hadoop’s home to define the parameter as follows.
export JAVA_HOME=/home/hduser/jdk1.7.0_55
5. Create Hadoop tmp
Create a tmp folder in HADOOP_HOME
mkdir -p $HADOOP_HOME/tmp
If you want to know why you can read more here.
6. Edit Hadoop config files
core-site.xml
vim $HADOOP_CONF_DIR/core-site.xml
Add below in between configuration tag
<property>
<name>fs.default.name</name>
<value>hdfs://master:9000</value>
</property>
<property>
<name>hadoop.tmp.dir</name>
<value>/home/hduser/hadoop-2.7.1/tmp</value>
</property>
hdfs-site.xml
vim $HADOOP_CONF_DIR/hdfs-site.xml
Add below in between configuration tag
<property>
<name>dfs.replication</name>
<value>2</value>
</property>
<property>
<name>dfs.permissions</name>
<value>false</value>
</property>
<property>
<name>dfs.secondary.http.address</name>
<value>master2:50090</value>
<description>Enter your Secondary NameNode hostname</description>
</property>
mapred-site.xml
Let’s create a mapred configuration file from the template given.
cp /home/hduser/hadoop-2.7.1/etc/hadoop/mapred-site.xml.template /home/hduser/hadoop-2.7.1/etc/hadoop/mapred-site.xml
Now let’s edit it.
vim $HADOOP_CONF_DIR/mapred-site.xml
Add below in between configuration tag
<property>
<name>mapreduce.framework.name</name>
<value>yarn</value>
<description>Execution framework.</description>
</property>
yarn-site.xml
Okay we are almost there. Hang on! Let’s configure yarn now.
$HADOOP_CONF_DIR/yarn-site.xml
Add below in between configuration tag
<property>
<name>yarn.nodemanager.aux-services</name>
<value>mapreduce_shuffle</value>
</property>
<property>
<name>yarn.nodemanager.aux-services.mapreduce.shuffle.class</name>
<value>org.apache.hadoop.mapred.ShuffleHandler</value>
</property>
<property>
<name>yarn.resourcemanager.resource-tracker.address</name>
<value>master:8025</value>
</property>
<property>
<name>yarn.resourcemanager.scheduler.address</name>
<value>master:8030</value>
</property>
<property>
<name>yarn.resourcemanager.address</name>
<value>master:8040</value>
</property>
slaves
One last configuration.
vim $HADOOP_CONF_DIR/slaves
Add below content.
slave1
slave2
slave3
7. Repeat
Okay now whatever things we did up to here(Step 1 to 6) should be done in the secondary master as well as all the slaves. It’s time to repeat the steps. Boring right? You can use rsync to copy the files located in in $HADOOP_HOME/etc/hadoop to all nodes. If you don’t know much about rsync it’s time to start reading this.
8. Format the namenode
Go back to the master node and execute the below command to format.
hdfs namenode -format
9. Start Hadoop
Time to start the cluster(HDFS/YARN) and I wish you all the best. In the master node these two files reside inside the sbin folder of Hadoop. So go to Hadoop home and to sbin.
./start-dfs.sh
./start-yarn.sh
Else you can right away use below which is being depreciated.
./start-all.sh
Hope you are good.
10. Testing
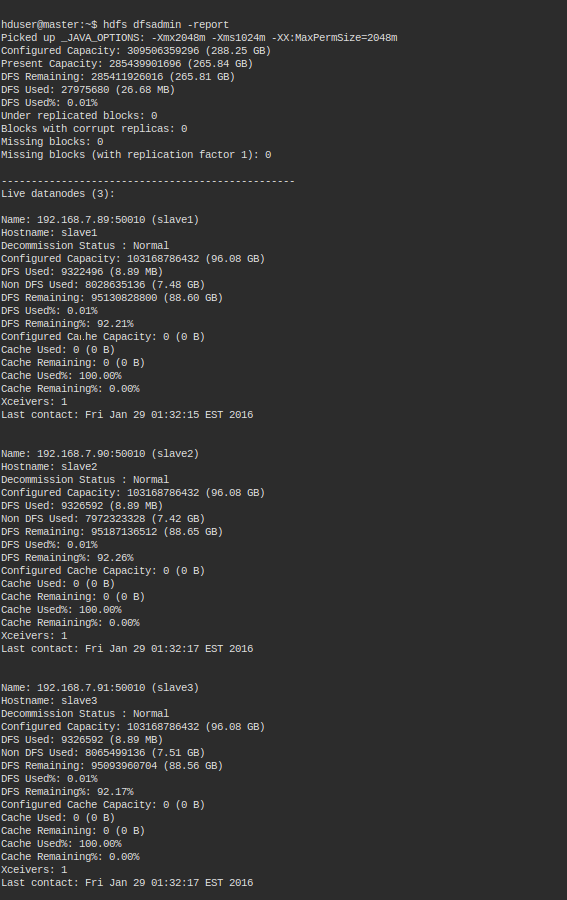
In the master node execute the below command.
hdfs dfsadmin -report
You should get an output somewhat similar to this. It might differ according to your configurations.
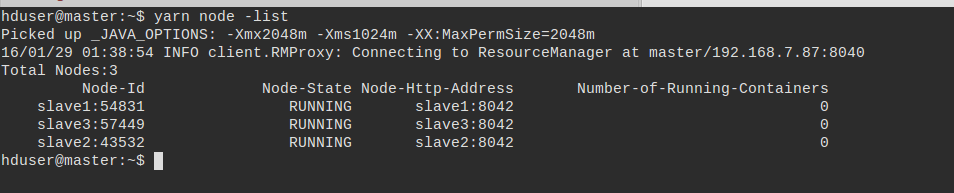
Let’s do another test. Let’s check the list of nodes now.
yarn node -list
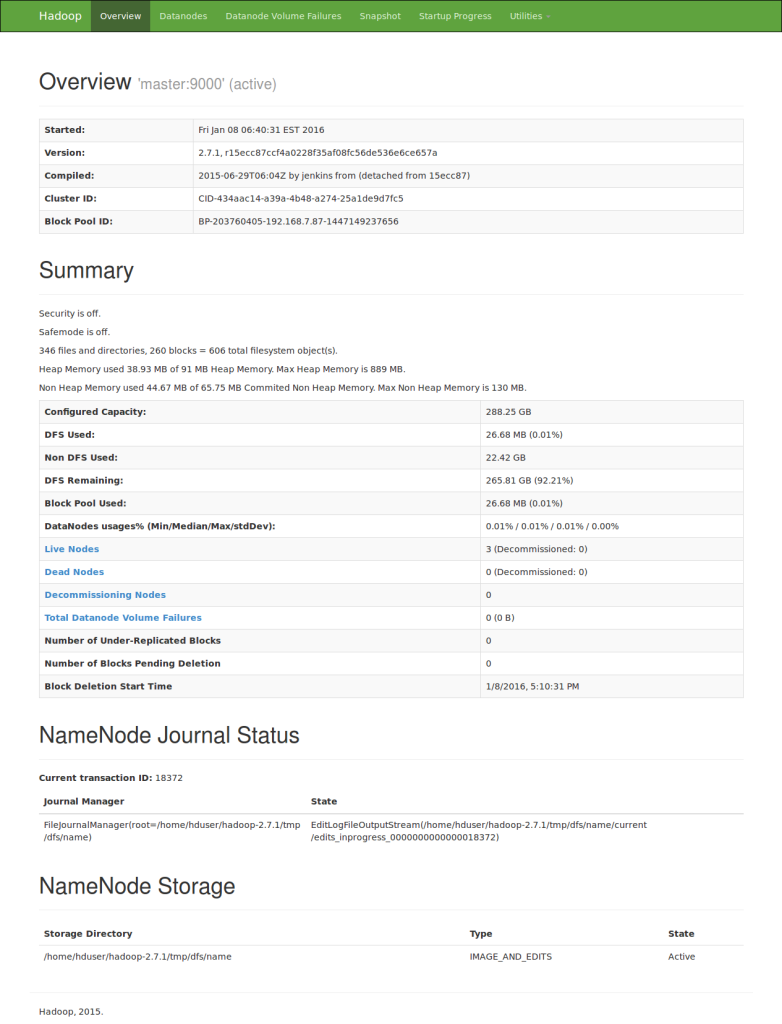
Last but not least let’s look at the Hadoop’s web UI. Fire up a browser and type the below URL.
http://192.168.7.87:50070/
Replace 192.168.6.87 with your namenode IP. You should get something like below and it is the web UI of the NameNode.
If you reach here you are in good shape. That’s about it. If you have any questions let me know in the comments below. Your feedback is highly appreciated(happy-face).
![]()
Hi Dasun,
Just a query wrt JAVA_HOME … this is usually installed on /usr/lib/jvm/java-7-openjdk-i386..I don’t get setting JAVA_HOME to /home/hduser/jdk1.7.0_55
Would you be kind enough to explain this? Thanks.