What’s MySQL Replication
Replication enables data from one MySQL database server (the master) to be replicated to one or more MySQL database servers (the slaves).
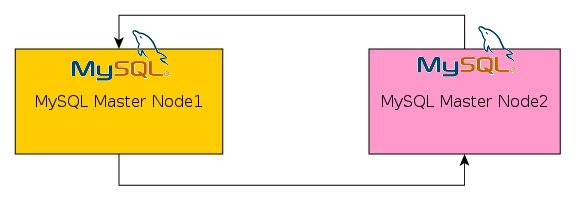
So MySQL Master-Master Replication
In other words MySQL replication is the process by which data stored in a database, will be copied to a second server’s database. This is called MySQL master-slave replication. Today I’m going to focus on MySQL master-master replication where it allows data to be copied from either server. In other words perform reads or writes from either server.

Below are the two server we are going to use, Server X: 192.168.X.28 Server Y: 192.168.Y.29
Step 1 – Install and Configure MySQL on Server X
sudo apt-get install mysql-server mysql-client
We need to edit /etc/mysql/my.cnf on Server X and add below lines.
server-id = 1
log_bin = /var/log/mysql/mysql-bin.log
binlog_do_db = sample
auto-increment-increment = 2
auto-increment-offset = 2
#bind-address = 127.0.0.1
After you save and quit that file, you need to restart mysql:
sudo service mysql restart
Open up the MySQL shell.
mysql -u root -p
We have to create a user where the user is used for the replication. User “replicator_user” & replace “password” with the password you wish.
create user 'replicator_user'@'%' identified by 'password';
Next, we need to give this user permissions to replicate the data:
grant replication slave on *.* to 'replicator_user'@'%' identified by 'password'; flush privileges;
The following command will output important information which will be used later.
show master status;
+------------------+----------+--------------+------------------+
| File             | Position | Binlog_Do_DB | Binlog_Ignore_DB |
+------------------+----------+--------------+------------------+
| mysql-bin.000001 | 1005     | sample       |                  |
+------------------+----------+--------------+------------------+
1 row in set (0.00 sec)
lock the database to prevent any new changes
flush tables with read lock;
Let’s export the database using mysqldump
mysqldump -u root -p sample > sample.sql
unlock the databases (making it writeable again).
unlock tables;
Finish up by exiting the shell.
Step 2 – Install and Configure MySQL on Server Y
We need to repeat the same steps that we followed on Server X.
sudo apt-get install mysql-server mysql-client
Let’s start by editing the /etc/mysql/my.cnf file.
server-id = 2
log_bin = /var/log/mysql/mysql-bin.log
binlog_do_db = sample
auto-increment-increment = 2
auto-increment-offset = 1
#bind-address = 127.0.0.1
After you save and quit the file, you need to restart MySQL:
sudo service mysql restart
It’s time to go into the MySQL shell.
mysql -u root -p
Next, we need to create the database that we are going to replicate.
create database sample;
then exit
exit;
Import the database that you previously exported.
mysql -u root -p sample < /path/to/sample.sql
Let’s login the back to the shell. Just as on Server X, A user will be created which will be responsible for the replication.
create user 'replicator_user'@'%' identified by 'password';
permissions for replication
grant replication slave on *.* to 'replicator_user'@'%' identified by 'password'; flush privileges;
This will allow replication to begin. The following should be typed at the mysql shell
slave stop;
CHANGE MASTER TO MASTER_HOST = '192.168.X.28', MASTER_USER = 'replicator_user', MASTER_PASSWORD = 'password', MASTER_LOG_FILE = 'mysql-bin.000001', MASTER_LOG_POS = 1005;
slave start;
Now let’s make a note of the master log file and position to use to replicate in the other direction (from Server Y to Server X).
show master status;
+------------------+----------+--------------+------------------+
| File             | Position | Binlog_Do_DB | Binlog_Ignore_DB |
+------------------+----------+--------------+------------------+
| mysql-bin.000001 | 433      | sample       |                  |
+------------------+----------+--------------+------------------+
1 row in set (0.00 sec)
Step 3 – Completing Replication on Server X
Running this command will replicate all data from Server Y.
slave stop;
CHANGE MASTER TO MASTER_HOST = '192.168.Y.29', MASTER_USER = 'replicator_user', MASTER_PASSWORD = 'password', MASTER_LOG_FILE = 'mysql-bin.000001', MASTER_LOG_POS = 433;
slave start;
You be able to see the details of the replication by typing in this command. The \G rearranges the text to make it more readable.
show slave status\G;
As a verification that everything are working as expected examine the output of the above command and make sure that Slave_IO_Running and Slave_SQL_Running are both YES.
Tips & Tricks
Above mentioned configuration is the minimal configuration for a MySQL master-master replication. See the below for a full my.ini configurations.
server_id  = 1
log_bin  = /var/log/mysql/mysql-bin.log
log_bin_index = /var/log/mysql/mysql-bin.log.index
relay_log = /var/log/mysql/mysql-relay-bin
relay_log_index   = /var/log/mysql/mysql-relay-bin.index
expire_logs_days   = 10
max_binlog_size   = 100M
log_slave_updates   = 1
auto-increment-increment = 2
auto-increment-offset = 2
server_id = 2
log_bin = /var/log/mysql/mysql-bin.log
log_bin_index = /var/log/mysql/mysql-bin.log.index
relay_log = /var/log/mysql/mysql-relay-bin
relay_log_index = /var/log/mysql/mysql-relay-bin.index
expire_logs_days = 10
max_binlog_size = 100M
log_slave_updates = 1
auto-increment-increment = 2
auto-increment-offset = 1
Hope you got an idea how to do a MySQL master-master replication. If you have any questions on MySQL master-master replication let me know in the comments below. Your feedback is highly appreciated(happy-face).
![]()


Simplest way of doing replication…saved the time a lot…
Thanks a ton….
Thanks
simple and best